|
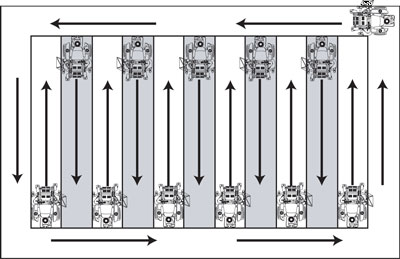
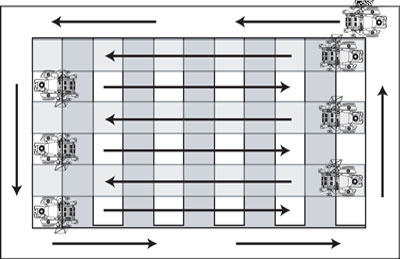
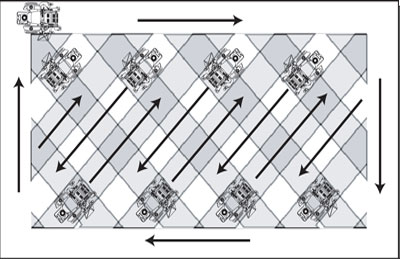
Ever wonder how to get that striped look for your lawn? It’s really not that hard to do, but you need the right equipment. The good news is, Ontario grass (cool-season grass) is the ideal type of grass to get this sought-after striping effect. How lawn striping works This may surprise you, but lawn stripes are not due to the lawn being mowed at a different height. The stripes you see on a lawn (or sports field) are simply the result of light reflecting off the grass blades. They’re actually made by bending the blades of grass in different directions. The direction of the bent grass determines the “light” or “dark” colour of the stripe. When the grass blades are bent away from you, the grass will appear lighter in colour because the light reflects off the wide, lengthy part of the blade. When the grass blades are bent towards you, the grass looks darker because you’re seeing more of the tips of the blades (a smaller surface to reflect light) as well as the shadows below the grass. That’s why cutting the lawn in an opposing pattern shows the most vivid stripes. To get the blades to bend, you’ll need a striping kit for your mower or roller. Basically, you’ll need a full-width roller mounted to the rear of your mower deck that support the weight of the mower and bend the grass blades down as you mow. You can buy a striping kit online or search for DIY hacks to build one yourself (we’re pretty sure our insurance company would have a word or two with us if we gave advice on how to alter your lawn equipment!). Picking your pattern The possibilities are practically endless, but simple stripes, checkerboards, and diamonds tend to be the most common patterns. Waves and circular patterns tend to be a little more complicated and difficult to do well. If you’re doing this for the first time, it might be helpful to sketch out your lawn with a few different patterns to help you visualize the effect. Whichever pattern you choose, always start by mowing the perimeter of your lawn first. From there, follow the diagrams below to get your desired pattern.
To create the wave pattern, do your perimeter cut then mow your first “stripe.” For a smooth wave pattern, keep your turns subtle and consistent. Try to keep a line of sight with a tree, post, or other landmark as points of reference to help with alignment. Continue to align stripes parallel to the first one. Additional lawn striping tips:
Lawn striping can definitely add that wow factor to your lawn, and the healthier the lawn the more effective your striping efforts will be. If you’re looking to take your lawn to the next level, contact us for a quote.
0 Comments
Your comment will be posted after it is approved.
Leave a Reply. |
 RSS Feed